Quick Links

YouTube is the world’s second most visited website, with more than 14 billion visits each month – topped only by Google.
It’s also the world’s second-largest search engine, once again, only surpassed by Google.
That’s why the platform is invaluable for digital marketing and SEO. If you aren’t leveraging the power of video to promote your business, it’s never too late to start.
But what if you don’t have Hollywood-par equipment to make YouTube videos?
That’s not a problem. You can create an engaging, high-quality video by only using a smartphone and some basic video editing software in today’s age.
Videos are fantastic for improving customer engagement and retention. In fact, 94% of marketers say that videos helped their users better understand their products and services.
YouTube content can also bolster your SEO efforts by placing videos in your blogs. For example, including a step-by-step instructional video with a blog post will make the content more robust and more likely to rank higher in the SERPs.
If you want to learn how to film your first video, you’ve come to the right place.
In this post, I will teach you how to make a Youtube video using only basic equipment that you likely already have.
Why Video Marketing Isn’t Going Anywhere
The popularity and prevalence of video content only continue to rise. Even while YouTube is 17 years old now, the platform continues to lead the fray for video creators. Here are a few eye-opening statistics that prove this point:
- By 2022, online videos will account for more than 82% of online traffic.
- 694,000 hours of video stream live on YouTube each minute.
- 81% of all internet users have used YouTube.
Okay, so it’s clear that YouTube is a video behemoth that isn’t going anywhere anytime soon. There are plenty of reasons why that is, too.
One of which is that people prefer to watch videos instead of reading text. It makes sense if you think about it – why spend 15 minutes reading an article when you can watch a brief 2-minute video explaining the same subject?
Forbes even reports that 59% of company decision-makers would rather watch a video than read an article or blog post.
They even go so far as to claim that one minute of video content is the equivalent of 1.8 million written words. So if you have a particularly urgent or powerful message to get across, consider making a video.
The impact of video on marketing campaigns
Well-made videos can provide incredible value for your search engine optimization. In fact, nearly 25% of all Google searches have video results.
Do you struggle with your dwell time and bounce rate? If so, you should know that video can drastically help with both.
Video marketing will also work wonders for brand recognition and customer loyalty.
- Videos are memorable and will stick in customers’ minds.
- If you regularly update your YouTube channel, it keeps customers coming back for more.
- 99% of YouTube users have accounts on other social media platforms – so they can share your content.

Here’s another fun fact – videos on social media generate 1,200% more shares than text and images put together.
In short, if you’re running a modern digital marketing campaign, you can’t afford to ignore the power of video content.
Yet, there’s a catch to all these mouthwatering statistics – mastering video production doesn’t happen overnight.
Shooting and editing a good video can be a daunting task for beginners. You’ll also need to set aside a budget for creating videos and maintaining your YouTube channel.
The good news?
Learning how to make a YouTube video does not have to be complicated or expensive. You can shoot everything on an iPhone (or Android), edit it in iMovie, and still get great results.
That’s because the quality of your script and the relevancy of your topic matter far more than the video’s resolution or production quality.
Let’s learn how to write, shoot, and upload videos on YouTube without further ado.
Step 1: Brainstorming Topics for Videos
Most video creators find the first step the hardest. For them, topic creation means sitting in front of a blank word processor for hours while their brain slowly melts and turns into soup.
Luckily, coming up with topics doesn’t have to be difficult (or painful) at all – especially if you have an existing website that already has blogs. In that case, an effortless way to come up with topics is to repurpose your most successful blog content into videos.
All you have to do is identify your top-performing blogs – and voila – you already have plenty of topic ideas. Not only that, but blogs tend to be pretty easy to turn into video scripts.
To start, use a tool like Google Search Console to discover which blogs are getting the most:
- Organic Traffic
- Customer conversions
- Shares on social media
The blogs that show up at the top are your top video candidates. If the content already found success via text, imagine how popular it would become in video form?
The writing is already there, so all you need are some visuals to go along with it. You could choose to include voiceover narration or use live actors in your videos. Either way, your goal should be to capture the spirit of what made the most successful.
If the blog was informative, your video should be too. If it was more entertaining, the video should follow suit.
Creating videos to accompany existing blogs
Another way to generate topics is to create videos to go along with existing blogs instead of replacing them. In this sense, the video is an accompanying piece, not the main focus.
Do you have any blogs explaining how to do something or use a specific product?
If so, they are golden opportunities for videos. In particular, you can create a simple tutorial and step-by-step videos to accompany your blog.
Creating videos like this serves two purposes. For one, it boosts the SEO for the blog post – as a video will increase your ranking power. Secondly, it’s a new video that you can add to your YouTube channel, increasing your chances of ranking on YouTube’s SERPs.
By optimizing your video for YouTube, you can increase the number of hits you receive on the platform. That’s all the more advertising and recognition your brand will receive due to your videos.
That’s why you should look for any opportunity to create a simple video educating your audience – and existing blogs are a great place to start.
Do keyword research on YouTube
If you don’t have any blogs yet or are looking for other ways to come up with topics – you should do YouTube keyword research.
Since YouTube is technically a search engine like Google, its users find videos by entering search queries or keywords.
As such, researching what your audience searches for on YouTube can spark some topic ideas. You can use Ahrefs’ YouTube Keyword Tool to find what your customers are looking for the most.
Once you find some hot keywords related to your niche, look at the top-ranking videos. Not only will that help you come up with topics, but you can see where the highest-ranked videos fall short.
For example, let’s say that you sell acoustic guitar strings and accessories. You do some digging and find the keyword ‘guitar strings acoustic’ works well for you.
The top-rated video covers how to change strings on a guitar.
How can you outdo that?
Why not create a video breaking down not only how to change strings – but also the name of each string, the types of gauges, and the difference between steel strings and nylon strings.
Now not only do you have a great topic in mind, but you also know how to outdo the competition with entirely unique content.
Humanize your company/organization with vlogs
Sometimes, a simple vlog is best if you’re stumped and have zero YouTube video ideas. After all, vlogs will humanize your company – as they grant your customers a glance inside your operations.
You could start with an intro video letting your audience know who you are and what you do.
From there, you could do a weekly vlog series where you or someone from your company films their daily routine. These ‘day-in-the-life’ style videos are very popular, and they help your audience empathize with you.
The best part?
You don’t have to spend time storyboarding or writing a script! Vlogs are spontaneous and capture a slice of life, so you don’t need to write them. In fact, a scripted vlog will come off as inauthentic, so flip the camera on and let fate take the wheel.
Step 2: How to Write an Engaging Video Script
Now that you have some topics in mind, it’s time to write the script, so your videos actually have content.
If you’ve never written a script before, there’s no need to be intimidated.
There’s no right or wrong way to write the script for a YouTube video. You won’t need to submit it anywhere, so formatting factors like fonts and margins won’t matter.
What will matter is nailing the tone while providing ample information for your viewers.
When it comes to writing dialogue, it’s best to follow the KISS philosophy or ‘keep it simple stupid.’
There’s no need to get fancy with dramatic monologues or large words. Instead, aim for an organic, natural tone that’s highly conversational. Speak to your audience like you’re talking to a friend.
Also, you don’t want to come off as condescending, so be as down-to-earth as possible.
You also probably won’t need to script out every single word. For most videos, a simple list of bullet points will suffice. That way, your presenter can speak naturally while ensuring they touch on all the most important topics.
Yet, if you’re writing subtitles for voiceover, you’ll want to write out every word while being as specific as possible.
Tone
Take your target audience into account when coming up with the tone for your video.
What type of content do they enjoy? While being conversational is essential, it’s also crucial not to ignore your demographics.
For example, if you’re selling products to an older crowd, you’ll want to take on a more professional tone. If you’re targeting the youth, you can be laxer with your copy and even include emojis/modern slang.
Consistency in tone is also a must for your YouTube videos. If your videos all vary drastically in tone, you’ll have difficulty building an audience.
Once you’ve settled on a tone, stick to it like glue. The more consistent you are with your audience, the more they will trust you and see you as a thought leader in their field.
Video length
Your script will dictate the length of your video as well, so be mindful of that. As a rule of thumb, it’s far better to have a shorter watch time than a longer one.
Why is that?
It’s because viewer engagement begins to fade after 2 minutes.
To avoid losing your audience, do your best to create concise scripts that get straight to the point.
Avoid being too wordy or padding your videos for length. If your video is only 30 seconds, great! There’s no need to make a video longer if all you’re after is length. Instead, only add content if it’s integral to the information already provided in the video.
Here’s a helpful tip: In general, one page of a script translates to one minute of screen time. Going by this formula, you should try to make all your video scripts two pages or less.
Provide a detailed call-to-action (CTA)
Okay, so now that you’ve provided your viewers with value, it’s time to tell them what to do next. After all, the point of creating videos is ultimately to convert, so you can’t forget to include a clear call to action.
Before including one, ask yourself what your goal was when you created this video.
Did you hope to sell more products or get more newsletter sign-ups?
Knowing that will dictate how you go about creating a CTA. An example would be including the link to your newsletter sign-up page in the description and reminding viewers about it at the end of the video.
“Don’t forget to check out our newsletter, which is provided in the description.”
Or you can encourage viewers to check out your website to learn more about your products.
“Like what you see here? Don’t wait to head over to our products page to learn more.”
That’s all it takes to include a helpful CTA informing viewers how to take the next step.
Step 3: Shooting Your Videos
Lights, camera, action!
Or maybe not. It’s no secret that video production equipment runs on the expensive side – especially prosumer cameras and gear.
It’s not uncommon for cameras to cost hundreds of thousands, and the rental rates are also through the roof. So how can you expect to take your YouTube account to the top without Hollywood-grade production gear?
The truth is you don’t need any of that stuff, especially if you’re only a beginner or have a more than modest budget.
Popular YouTubers have been proving this for nearly two decades now. Some of the most popular creators on the platform only use a simple webcam and basic audio equipment. Countless others use smartphones and free video editing software – yet still rake in millions of views.
In today’s age, nobody expects YouTube videos to have feature film quality visuals, nor do they need them.
After all, if you’re looking for a tutorial or educational information, it’s not likely that you’ll care if the video was shot on an 8K digital camera. As stated before, it’s the content that counts. As long as the tutorial lets you know how to use your new washing machine, it doesn’t matter how it was shot.
Not only that, but the quality of phone cameras has gone through the roof in recent years. Your average iPhone camera can shoot in stunning 4K resolution – which is more than enough.
DSLR cameras are also relatively affordable and provide amazing visuals. In fact, many short films and TV shows shoot on DSLRs for this very reason. As a point of reference, a Hollywood camera can cost $100,000, while an exceptional DSLR will only run you a few grand (or less).
Selecting your talent
All right, now that you have your camera situation worked out – you need to decide who will physically appear in the video (if anyone).
If you can’t hire anyone and are particularly camera-shy, you can choose to provide voiceover only.
If you’re going to use people, though, you’ll want to plan that out beforehand. You don’t need to scout for local actors, either. Most of the time, yourself or some of your coworkers will more than suffice.
You just need someone comfortable enough to read the lines conversationally.
Also, don’t worry about reading the entire script in one take. Instead, the beauty of video is that you can combine multiple takes into one at the end.
All you’ll need to do is memorize a few lines at a time and then deliver them to the camera. Once the shooting is done, you can compile and assemble the pieces into one seamless performance. We’ll dive more into the editing process in just a bit.
Your talent should stay energetic throughout the read. The last thing you want is for your talent to read your lines with little to no enthusiasm, as that will bore your audience to tears. Instead, make sure your talent is pepped up and ready to deliver the lines with a lot of energy.
It may take a few takes to get right, so don’t get frustrated. Instead, remain calm and stay positive with your talent. If they don’t have high energy, offer them a cup of coffee or an energy drink.
Once you get the hang of it, you’ll be off to the races. It’s something that takes practice to nail, so don’t be shy about creating your first video.

Composing shots
Great talent is only half the equation in creating a good video. You’ll also want to incorporate a few competent filmmaking techniques to make your video engaging.
If you’ve never shot a video before, there are a few things you’ll want to keep in mind.
Remember to hold the phone horizontally if you’re shooting with your iPhone. That ensures that your video will take up the entirety of the screen on YouTube. If you shoot vertically, you’ll wind up with a ‘portrait-style’ shot – where the sides of the screen will have black bars.

That doesn’t look good, so always shoot horizontally.
Beyond that, you’ll want to keep the phone as steady as possible. Try leaning your phone up against something to keep it still during shooting. That can be as simple as using the edge of a book once you find the perfect angle.
When shooting people, you’ll want to frame them properly. In particular, you’ll want to make sure each subject has ample headroom.
That means leaving enough space above their head in the shot. There’s a sweet spot here, roughly an inch of headroom. Too much, and it’ll look awkward – as their head will be toward the bottom of the screen. Not enough headroom, and you’ll end up cutting off your subject at the top of the screen.
A medium shot will work best if your subject is speaking to you head-on. That’s where you frame your subject from the waist up.
You can shoot from behind each person’s shoulder if you’re filming a conversation. That’s known as a shot, reverse shot setup.
Step 4: Video Editing
Shooting is done, which means it’s time to enter post-production or the editing process. There’s a real art to video editing, and it can either make or break your video.
The good news is there are plenty of free programs you can use that are user-friendly.
If you’re an iPhone user, iMovie is all you need to edit basic videos, and it comes included with your iPhone or Mac.
So what is editing all about?
In short, it’s how you handle the transitions from shot to shot. In other words, videos are made up of multiple takes, and the editing process is where you string them all together.
The end goal is to create a cohesive recreation of your script by choosing the strongest takes.
Yet, you’ll soon find that you need ways to hide specific transitions and smooth out other ones.
An example would be when you cut to a different shot of the same person in the same place. This is known as a jump cut, and it was once considered a grave mistake in filmmaking. Yet, jump cuts have become far more prevalent in today’s age – thanks in no small part to YouTube creators.
Yet, they don’t always look good, so you’ll want to have a way to avoid them.
That’s where B-roll comes into play. B-roll footage is anything extra you capture to enhance your video and hide transitions.
B-roll can be all sorts of things – stock footage, scenic landscapes, buildings, etc. What’s important is that your B-roll relates to the main video in some way. As long as it does, you can use any type of footage that you want here.
Breaking down the editing process
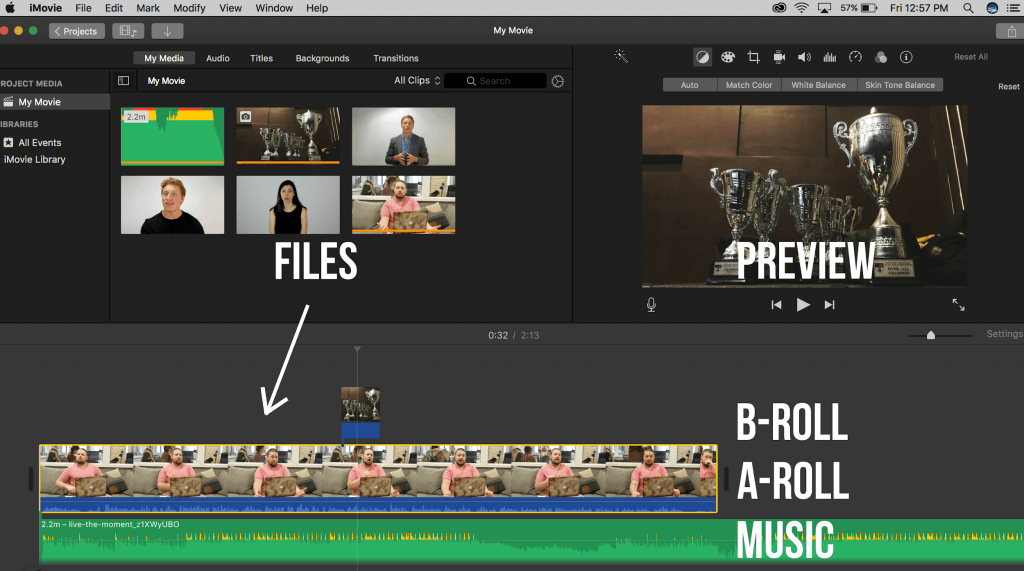
Here are the basic components of video editing:
- The Script. You’ll need a copy of the script on hand at all times when editing. It’s what will keep you on track when cutting all the different takes together. Without the script, it’s very easy to get lost.
- A-roll. The A-roll is the central part of your video, where your actors are reading the script to the camera. Any shot that’s part of your script/original vision is an A-roll shot.
- B-roll. Your A-roll breaks up the A-roll footage and enhances it. B-rolls can be images and infographics as well.
- Background music. Most videos are too static if they don’t have any type of music. Bear in mind that you won’t be able to use copyrighted music here, so it’s not a good idea to select tunes from your car’s playlist. Instead, either use stock music or hire a freelancer to create something original.
- Optional. If you lack the budget to shoot B-roll, then you could always use stock footage from sites like Unsplash, Pexels, or PikWizard.
Cutting and assembling footage
In the past, editors had to physically ‘cut’ the footage together – which was an incredibly cumbersome and time-consuming process. Luckily, modern video editing software has made that a thing of the past – and now all you have to do is drag and drop files:
- The first step is to import all of your footage into the program. Go to File > Import, and then select the folder containing all your footage.
- To stay organized, upload your A-roll first, so you don’t get your footage mixed up. Scour through each take and mark the ones that are best. Remember, you want high energy in the delivery and clear audio.
- After that, bring in the B-roll footage. This is where you can decide where you need B-roll the most to cover transitions and add to the atmosphere.
- Last but not least, add your background music and any other audio that you want to include.
You’ll be able to tweak the length of each clip, as well as when it cuts to another shot. Do your best to make each cut appear seamless. When a video is edited well, you shouldn’t even notice it. In other words, your goal when editing is to become invisible.
Pro tip: When cutting from one angle to another, try to cut during motion whenever possible. That’s because cuts that occur during movement appear far more seamless.
Once you’ve got your cut the way you want it (complete with an attractive video title containing your target keyword) – you’re ready to export the file. Go to File > Share to do so.
Step 5: How To Upload To YouTube
The last step in learning how to make a YouTube video is the uploading process.
Luckily, this is a straightforward process once you have an account. All you need to do is click on the camera icon with a + on it that says ‘Create.’ Once you do, you’ll have two options:
- Upload a video
- Go live
If you want to upload videos, select Upload video. If you’re going to do live streaming instead, hit the ‘Go live’ button.
Also, DO NOT forget to fill in the infoboxes for your video – as that’s how you’ll use incorporate SEO for YouTube.

Keep the following tips in mind:
- Tags. You’ll want to load up your video with as many relevant tags as possible. Of course, you’ll want to include your keywords here. Long-tail keywords tend to work best here, so keep that in mind.
- Title. Your page title is the most crucial spot to include your primary keyword, so don’t forget it.
- Description. The sweet spot here is 150 words that contain relevant keywords and tags. If it’s a repurposed blog post, you can include a link to the original post in the description.
Once these areas are all filled out, you’re ready to hit upload and go live with your video content. Don’t forget to embed the video on any related blogs, so you receive a boost in traffic.
Concluding Thoughts: How to Make a YouTube Video
Video content should be on your radar if you plan on starting a digital marketing campaign. By now, you should understand how to create high-quality videos on a low budget.
Need help with your digital marketing needs? Book a call with us today, or check out our other resources.







Do you have editing recommendations for those who do not have apple/iphone products and prefer Windows/Google/Android technology?
There is some great editing software out there. iPhones seem to be regarded as the best at making videos, but I’ve seen some good Android videos. Check out Filmora it’s as easy to use as iMovie and you can try out their free version before deciding whether you like using. And check out other tools for making cool Youtube intros if you want in our roundup of intro maker tools.
No problem, glad it was useful for you.
How a small SEO agency can make a video. For example, I have an article “best link building method for higher ranking” ( 2000+ Word) How could I convert this article into a video?
Some creativity is needed. Look at the main points in the article and break down your video’s structure according to those main points. Make it easy to understand so you don’t lose anyone’s attention. We often convert blog posts into video as part of our video service.
Thanks for the reply, I will read about your services.
Hello,
My question is: If I want to record my own screen (Desktop Based Tool) to make a tutorial or an online course. Which tool can I use to do this? I want to make Step-by-step tutorials, show my readers steps (in a Live demo), make online courses, etc
Check out Loom or for a more advanced application you can try Filmora.
Thank You. 🙂
Impressive!Thanks for the post
Awesome, this is really very helpful content thank you so much for this amazing information
very Nice Post
Hello very informational blog you have share. Can you help me in with the rules for making videos on YouTube?